Paging and Text Layout for a 2 Doctor Optometry Office
Sample Layout for a 2 Doctor Optometry Office
Note: There are many ways to label and use the LAN4000 and there is no wrong or right way to label it. This is one suggestion.

In the sample layout above each doctor has a row with their own color. These rows are labeled the same because in this example either Doctor can be in any of the 3 exam rooms and they each work one day per week by themselves. Each Doctor has the ability to page tech or optical by lighting the corresponding light on their colored row.
Also in this example, “Dr 2” is lit on the top row indicating that he/she has a patient waiting up front. “PT” is lit indicating that Dr 2 has a patient being worked up in Pre-test. On the green row, the “Ex 1” button is lit with a “green” light indicating that the Dr is in Ex 1. “Ex 2” and “Ex 3” is lit with the white light indicating that Dr 2 has patients waiting in “Ex 2” & “Ex 3”. The Green “Opt” button is lit indicating that Dr 2 is ready for optical to come to Ex 1 for the patient handoff.
The same functionality is available for Dr 1 on the “Blue” row.
The yellow “PU” button means that a patient is there for a pickup. The 3 white buttons on the bottom row are the names of techs and when these buttons are pressed they begin to time how long it takes a tech to work up a patient. When the workup is finished the tech stops the timer and the time is logged for future review. The blue and green “Dilate” buttons are to time patient dilations for each Dr.
Patient Sequencing can be set up to automate which room is next for each Dr. Also, different chimes can be assigned to Doctor, Tech, Optical etc. to alert the proper staff member of a new light signal.

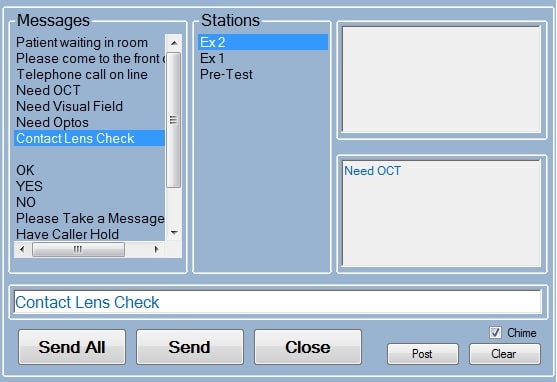
The text interface is seen below with sample messages that you can use your pre-sets (no need to type) The Message Panel displays your pre-set messages. The Stations Panel displays the available stations you can send a message to and the 2 screens on the right are in-coming and out-going messages.
In this example the “Contact Lens Check” preset is selected to be sent to “Ex 2”. It could be sent to all stations by clicking “Send All” or you could choose to send to Ex 1 and Ex 2 only.
The “Post” function allows you to send a message to yourself. For example you can post instructions to a tech, page them to the room and leave to go to your next patient. “Clear” will clear the in-coming and out-going windows to un-clutter the screen.
